Contents:
- Project Description
- Construction Drawings
- Summary of Experience
- Revit Files
Project Introduction
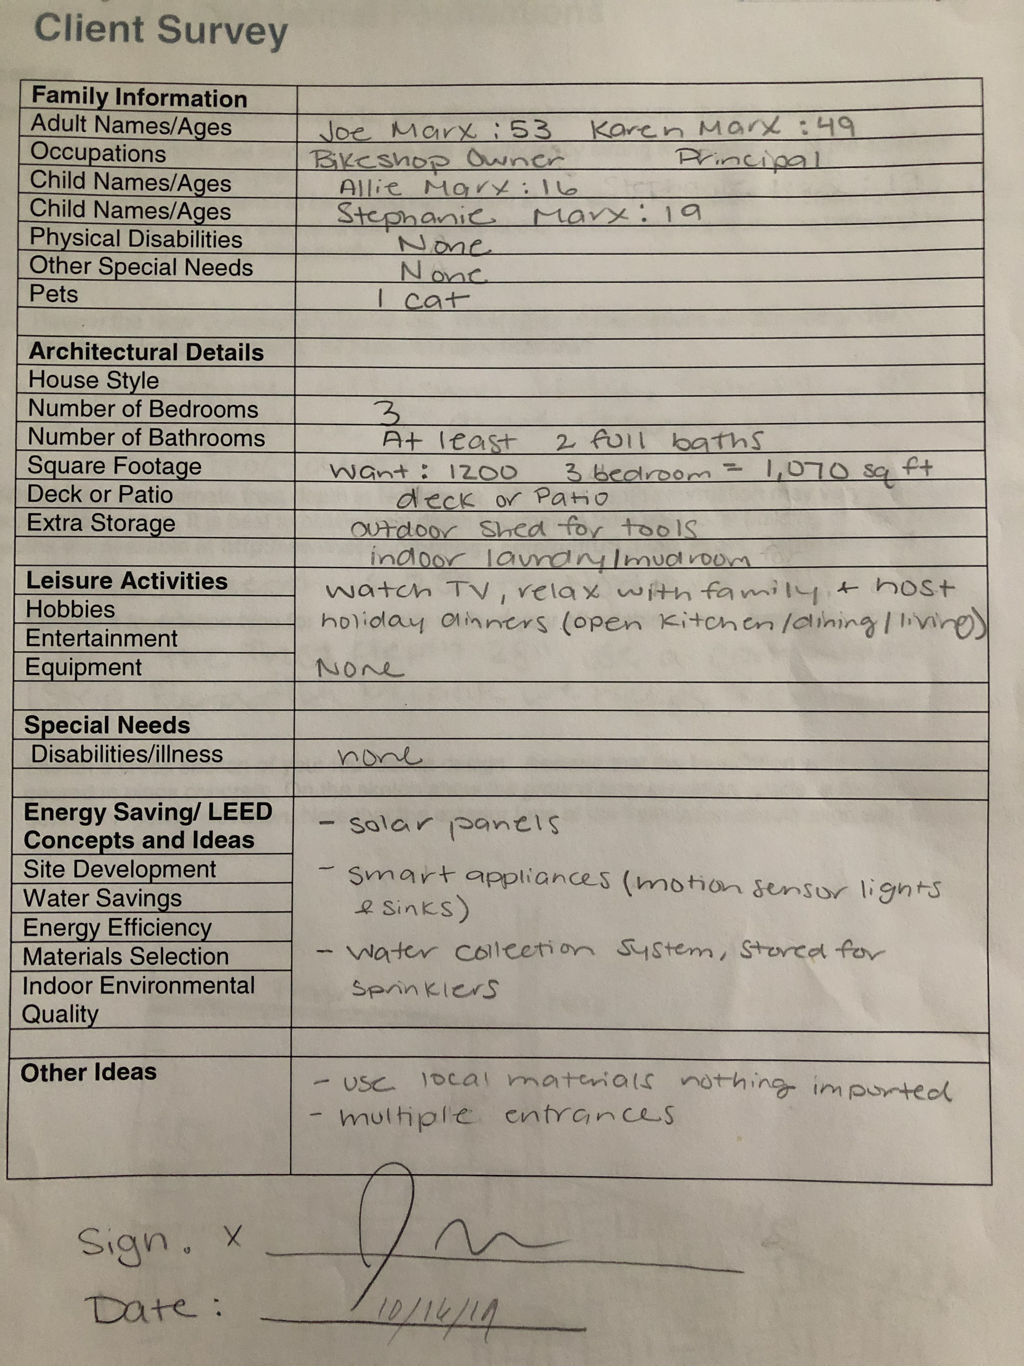
The Habitat for Humanity project goal is to design a house for our client by meeting their needs, while constraining to the design requirements and restrictions. I am designing a house for my client, Joe Marx. My client is a husband and father of two, who's main needs for the house, were 3 bedrooms, 2 full baths, an open concept living and dining space to accommodate holiday gatherings, as well as a deck/patio and laundry/mudroom.
In addition to the clients needs the design must follow the Habitat for Humanity guidelines, residential code requirements and the Universal design principles. In class we were given sheets for all the requirements with specific sizes, materials, dimensions and codes that our design must meet in order to build. I reviewed them in class and I used them as a guideline through out the process of designing my house.
In addition to the clients needs the design must follow the Habitat for Humanity guidelines, residential code requirements and the Universal design principles. In class we were given sheets for all the requirements with specific sizes, materials, dimensions and codes that our design must meet in order to build. I reviewed them in class and I used them as a guideline through out the process of designing my house.
|
When I interviewed my dad he told me some of the wants and needs for his dream habitat home. The main needs of the design were 3 bedrooms, 2 full baths, an open concept living and dining space, as well as a deck/patio and laundry/mudroom. He also mentioned in his wants a total of 1,200 sq ft, however the maximum square footage for a 3 bedroom home is 1,070 an outdoor shed/garage which is not allowed in the build. However, compromise were made and meet everyone's needs in the end.
|
|
Project Requirements and Codes
My original bubble diagram design that involve my clients needs.
|

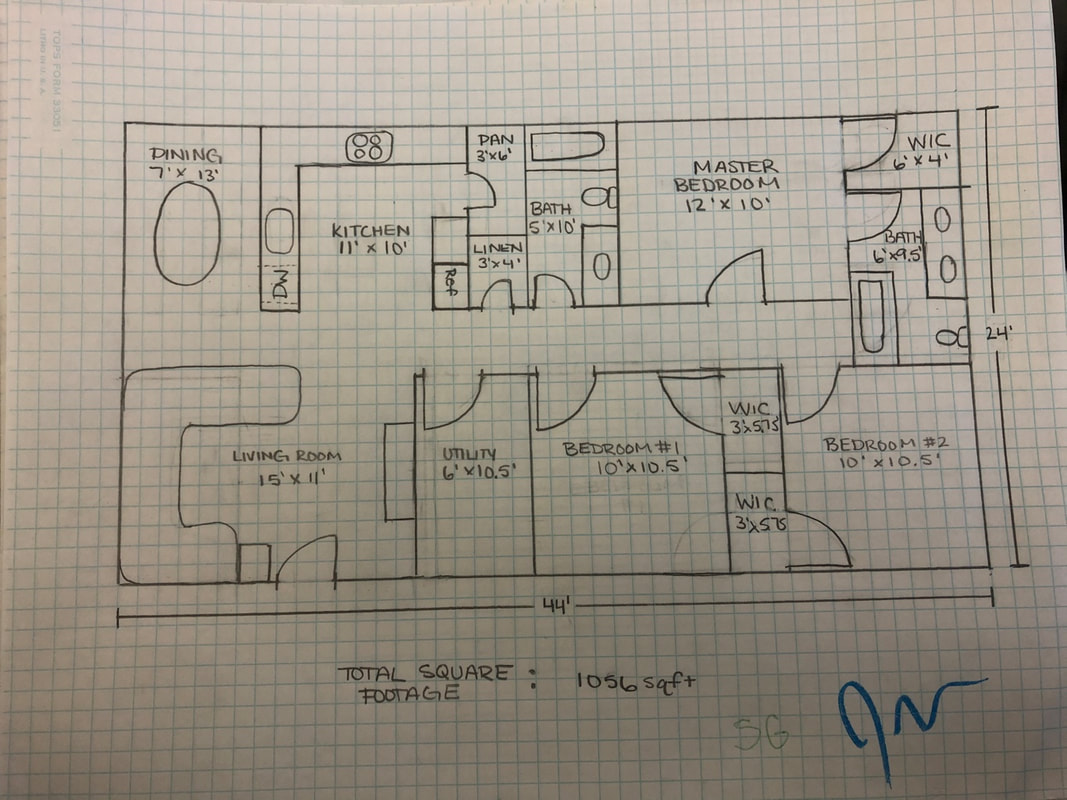
My quick sketch is the design I used when working on Revit.
|
I made many revisions to my design through out my designing process. Going from the bubble diagram to my quick sketch l decided to flip flop the placement of the master bedroom and the second bedroom as well as the kitchen and dining room and moving the pantry and the mudroom to the right of the living. Also, through my designing on revit I had to rearrange the placement of my furniture in the rooms to keep my design up to code and flowing properly.
Residential Code Requirements
|
Habitat for Humanity Codes
|
Universal Principles of design
|
Construction Drawings
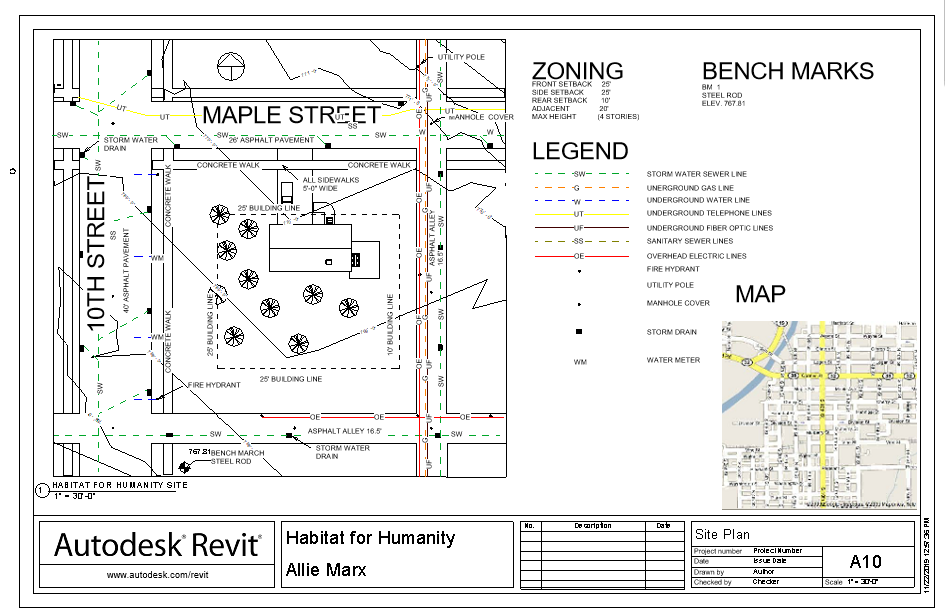
Sheet A10 is the site plan of the house, in Noblesville Indiana on the corner of Maple Street and 10th Street.

Sheet A20 is the clean copy of the floor plan as well as the 3D view of the house.
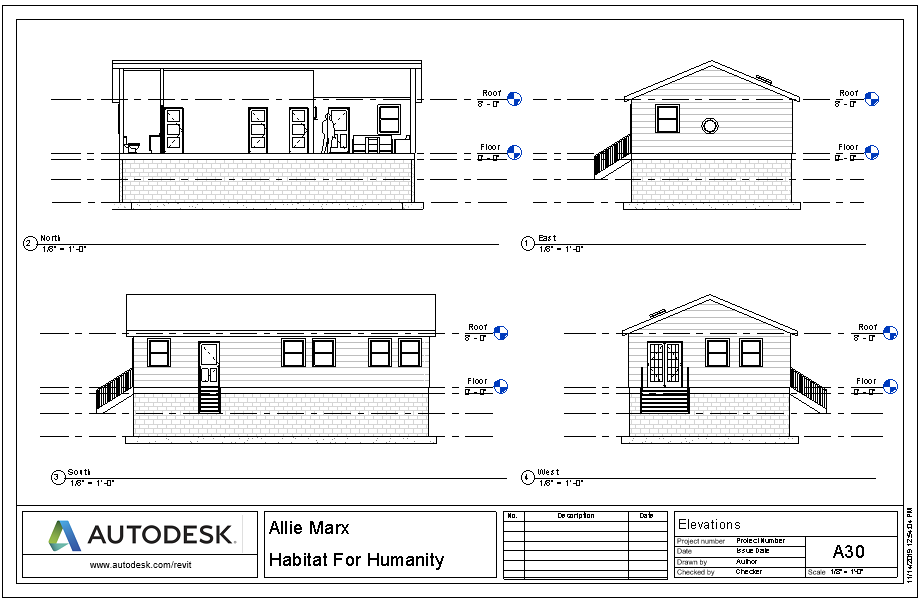
Sheet A30 contains all four of elevation views of my house (North, South, East and West).

Sheet A40 is the fully dimensioned floor plan of the house.
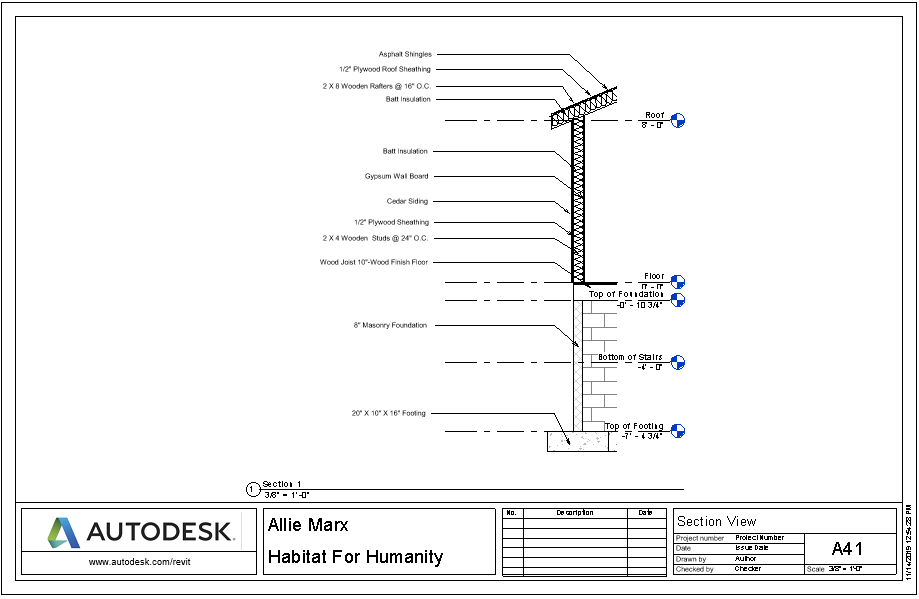
Sheet A41 is the section view of the exterior wall to the house, labeling all of the materials needed for the construction.
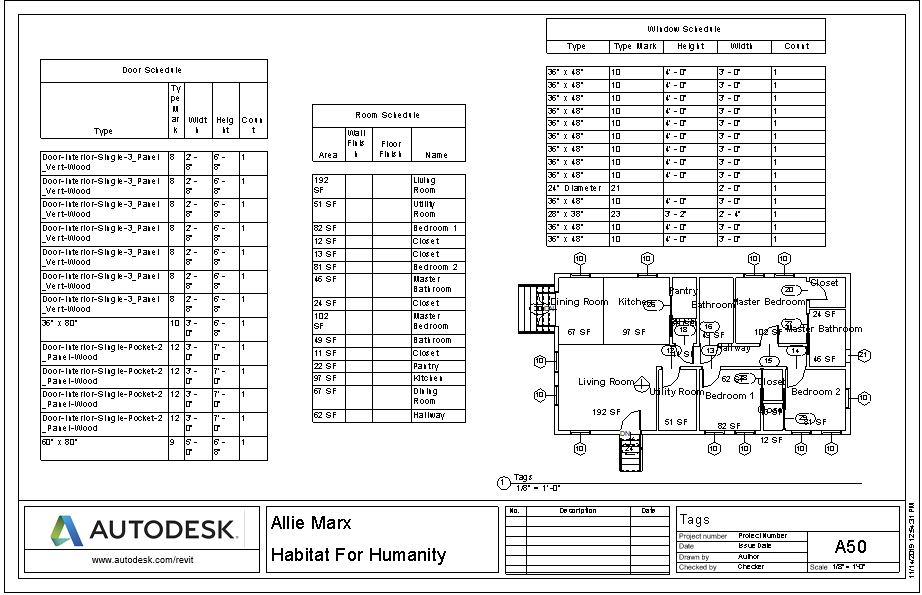
Sheet A50 is the tagged floor plan of the house and the door, room, and window schedules.
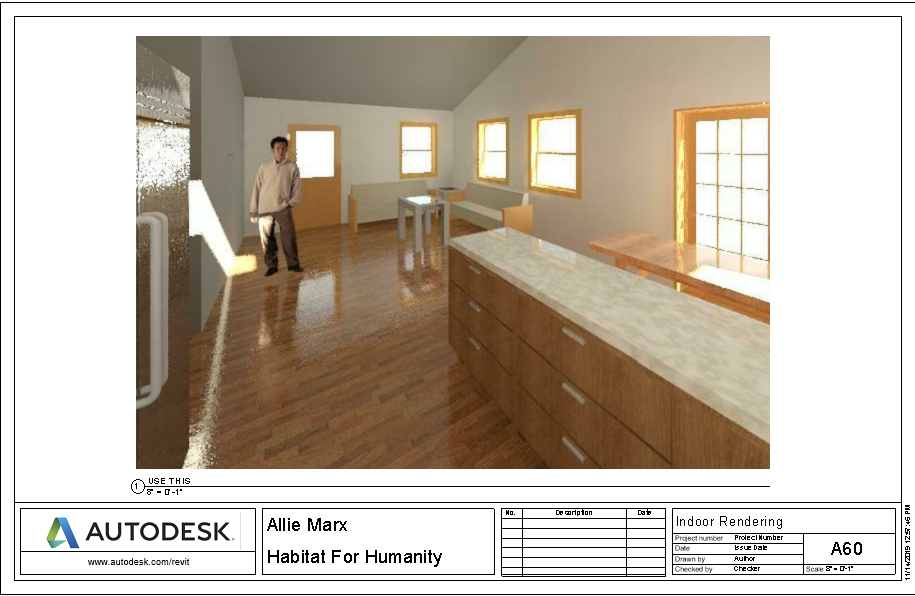
Sheet A60 is the interior rendering of the kitchen and living room area of the house.
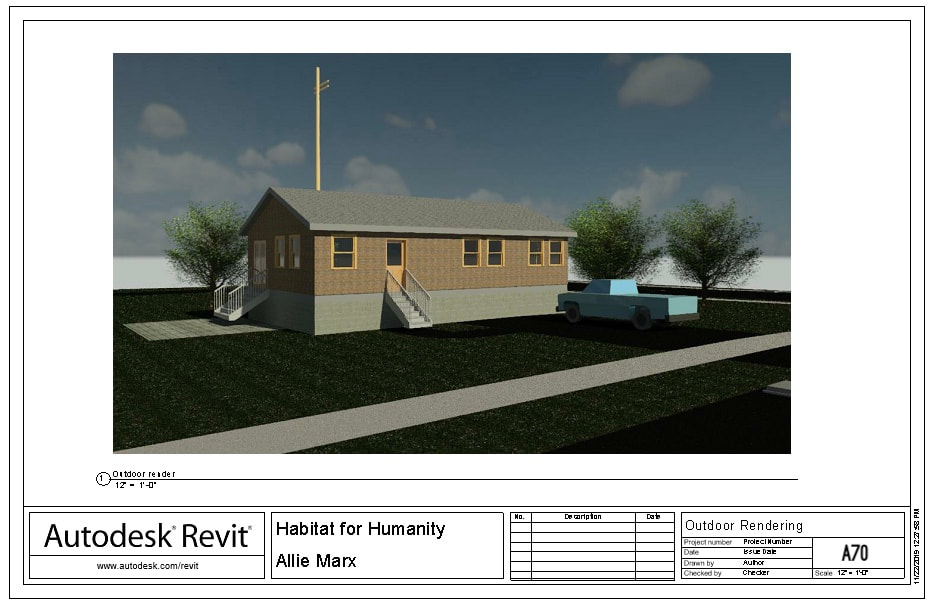
Sheet A70 is the exterior rendering of the house and drive way on the site.
Summary
In the beginning of the Habitat for Humanity project I was very excited to be creative and design a house and bring it to life on Revit. However, throughout the design process of this project I have discovered all of the ups and downs. When we first began interviewing our clients, gathering their wants and needs and began designing with our bubble diagrams and quick sketches I was the most excited. As we began designing on Revit my patience was tested, it was a big learning curve I knew the basics from the shed project but a house is much more involved than a shed! The basic floor plan and room design was fairly easy, but as day went on and codes and guidelines needed to be met I got more stressed. The Habitat Humanity Guideline, Residential Code Requirements, and Universal Principles of designs, were a challenge to meet in my design. The codes themselves weren’t difficult to follow it was remembering to follow them and finding time to measure and make sure codes were meet after every new feature was added or adjusted. Although following the codes wasn’t the easiest or most fun at times it is a necessary part of the design process of a house, especially if you want your design to be acceptable to build in real life. As I was designing on Revit and we were learning and adding new elements to our design, the available space in my design kept decreasing. This was a big issue because accessibility in a Habitat for Humanity Home is key. However, my designs total square footage is 1,056 which is under the maximum value for a three-bedroom design of 1,070 square feet, it has the required 42 in hallways and I was able to fit 3 bedrooms, 2 full baths, a utility room and open concept kitchen, living and dining room meeting my client’s needs and the given codes. Another really fun part of Revit was placing in furniture, and seeing our empty house become a home! I was able to reconfigure a predesigned kitchen into one that fit my space perfectly! However, as we neared the end of the project and were trying to put finishing touches on our houses and placing it into the site, time became a big issue. At some points I was scared I was not going to finish, but I was able to get all of my sheets completed and begin on the calculations of my home. The calculations for water supply and property drainage were also not my favorite part of the process, but again needed to be done in order to design a successful home. If I could go back to the beginning of the project I would try to budget my time a lot better, and double check my work as I progressed to eliminate future issues. With my extra time I would have loved to add in more furniture, paint the walls and chose different flooring types to add more character to the house. Throughout this whole project I have learned so much about the design aspect and hidden elements to home design. It is very exciting to me because I think I want to pursue a future in architecture and knowing the basics of the Revit software puts me at a great advantage and to able to only become better will help me on my way! In the end all of the stress and hard work payed off because I am very proud of my little house, and can’t wait to use Revit to design my dream one!
